Overview
A simple Batch Processing design is based on several steps that are executed sequentially. However, customized processes can also reflect quite complex workflows where incoming data is evaluated and the outcome triggers conditional actions such as ignoring certain documents or transferring them to other intercalated systems, for example for optical character recognition or to classify and digitally sign certain documents.
The following example illustrates how input can be routed through several Batch Processing chains (with different, associated directory folders) before resulting documents with their metadata are finally archived in ImageMaster. The workflow scenario implies that there are different cases where incoming files may still need to be converted or where an OCR is triggered.

Figure 308: Batch Processing workflow example
In the following diagram a simple process is illustrated with its data flow. The right-hand side reflects how the Scheduler controls the process and stores status data in a database.
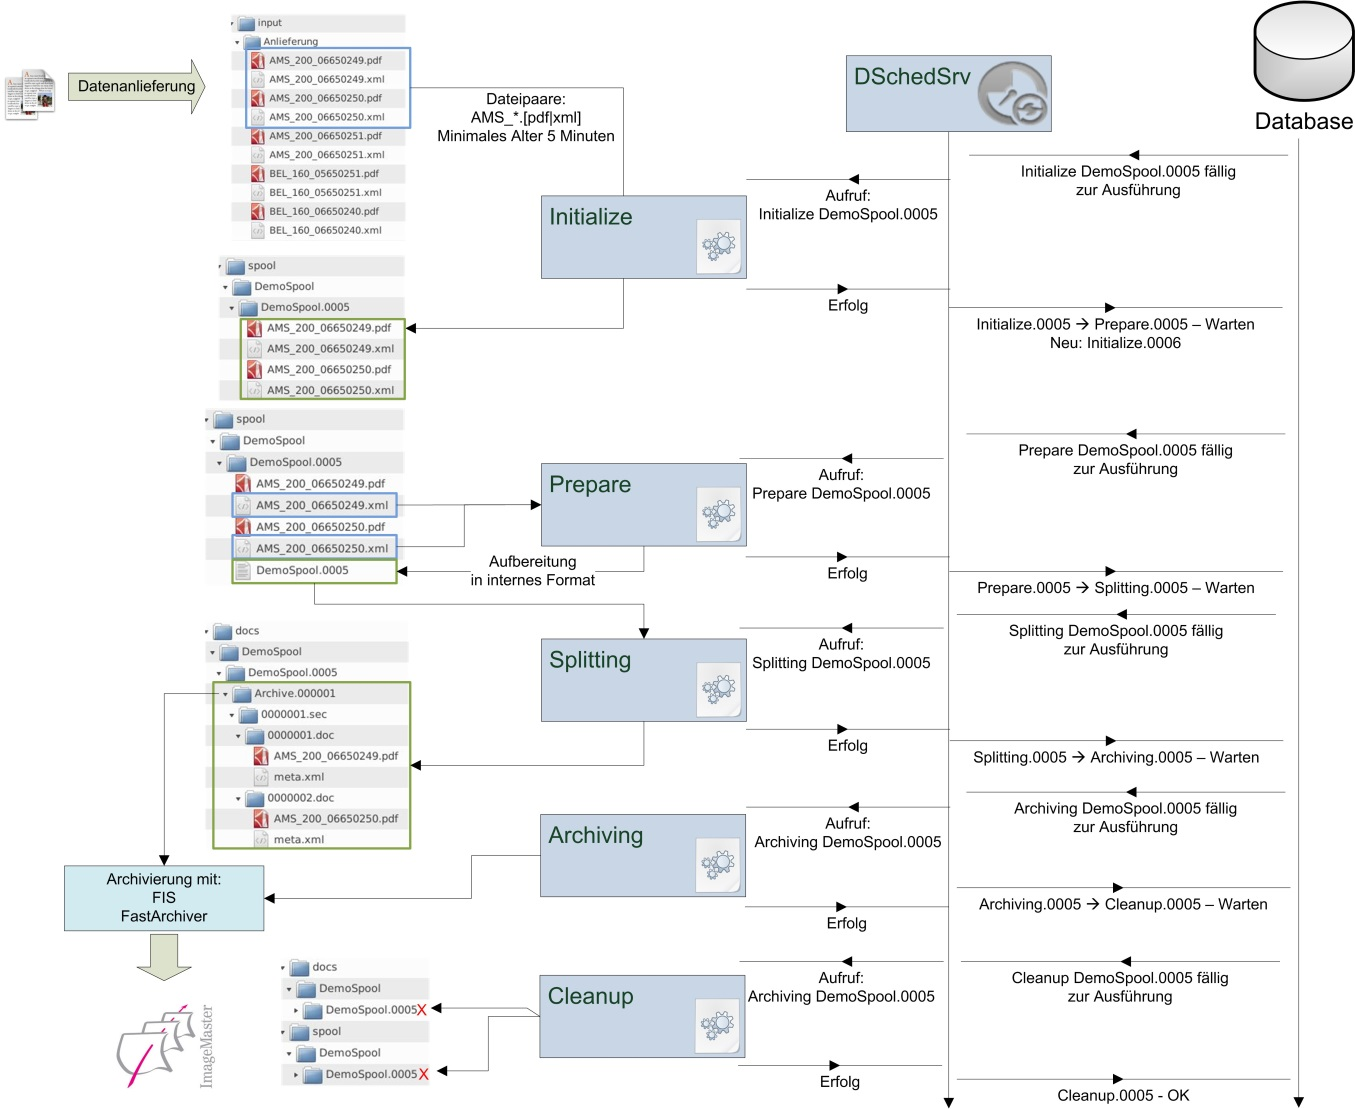
Figure 309: Batch Processing sequence example
A single Batch Processing step can be used in a variety of so called “JobModes”. A JobMode indicates the structure and format of incoming data. In the Initialize step, for example, a distinction can be made if single files, pairs of files or complete directories are processed in one spool.
The behavior of a Batch Processing chain is basically defined via two configuration files. Single steps of a chain can also have their own configuration files. The global configuration file is “base.cold.ini”, which specifies the working directories for the single steps.
Each spool type has one additional spool configuration file, which defines the single steps of a chain. The spool configuration and control parameters are explained in chapter Spool configuration.
The following table presents a short overview of standard Batch Processing steps. Depending on the level of customization additional steps can be present or required.
|
Step |
Description |
|---|---|
|
Initialize |
During the initialization incoming data is received and the input directory is checked for new files. If data is available, it is transferred into the spool for further processing and the input directory is cleaned. Depending on the configuration this data is backed up in another directory (e.g. “Save”). The content of the data is ignored in this stage. Depending on the JobMode an additional check can be triggered to verify that each input document file is fitted with a matching metadata file. |
|
Prepare |
In the preparation step the potentially inhomogeneous input data is transformed into an internal standard structure based on CSV. The data must be present within the spool directory already where they also remain during this step. |
|
Splitting |
The splitting step decomposes the input into a format and structure which is suited for ImageMaster import. This step expects a metadata format similar to CSV and it can be customized via further configuration files. Each data record can have its own split configuration. In the splitting step data is read from the directory “spool” and, after processing, data is written into the directory “docs”. Data in the spool directory is not changed. |
|
Archiving |
The archiving step transfers data from the docs directory into ImageMaster via FIS. This transfer can technically be a creation, a deletion or an update in ImageMaster 9. |
|
Cleanup |
The cleanup step deletes the files from the spool and docs directories, which are not required anymore after a successful archiving step. |
|
Unpack |
The unpack step extracts files in the spool directory. It can also target the docs directory if documents in there are already delivered in the required FIS input structure. |
|
Packing |
The packing step compresses data in the docs directory. This can explicitly be desired before archiving or after an export. |
|
Transfer |
This step can be used to transfer files from or to another system via FTS, SFTP, SCP or Samba. In theory the Initialize step can completely be replaced by a transfer step, but in practice a transfer is often rather fulfilled as a separate step. |
|
Convert |
Before archiving document files it can be desired to convert these into a different format based on the file type extension. Several formats such as office documents or raster images are often converted into PDF/A, which is considered more suitable for long-term preservation, and which can facilitate to render all documents from the archive via one common viewer. In customized scenarios this can also mean to add a timestamp or to transform several single TIF files into one multipage TIF document. |
|
Protocol |
This step can be used as an information channel to a support team or to a customer. Various kinds of reporting or logging are possible. E-mail notifications can be sent based on log files for example, or the standard ImageMaster 9 audit trail can be set up to cover specific update events. |
|
CheckDocs |
This step is used to check the incoming metadata of a document in the docs directory. Data validation can be based on predefined rules, which reject certain documents and sort them out. It is common practice to send a notification e-mail in such a case. Alternatively the process can be designed to halt in certain kind of error scenarios. |
|
Distribute |
Documents can be distributed into different directories based on their metadata. Technically the step is similar to “CheckDocs”, but instead of sorting documents out, they are moved to different target locations. This can be useful in a scenario for example, where different types of documents must be delivered to different SAP systems. |
|
Finalize |
The finalize step is very similar to a cleanup step, but additionally the log directory is removed. It is common practice to implement a delay which triggers a Finalize (e.g. 30 days) after a cleanup, so the technical support staff can still check related details on site. If logs are required to be preserved for a longer time, it is recommended implementing an additional step which packs and archives the log files in ImageMaster as well. |
|
Table 90: Step overview |
|