A client configuration can define an arbitrary number of transfer configurations. Each transfer configuration is identified by a name. The transfer configuration can be enabled or disabled by selecting or clearing the check box. The transfer configuration is enabled by default.
Transfer settings
This section defines the general transfer settings.
You can do the following actions with SAP configurations:
-
add / delete a configuration to / from the client
-
change configuration properties
To add / delete SAP configurations
-
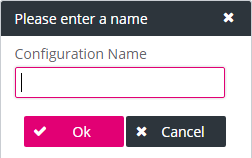
Click Add Configuration. Enter the name of the new configuration in the creation dialog and click OK. A new tab for the created configuration appears.
-
Click Delete Configuration selected in the list and confirm.
-
Click Save.
To specify properties for a configuration
-
Select an existing configuration tab.
-
Click the required subordinate tabs below and change the properties.
Mandatory fields are marked with an asterisk (*).
-
Transfer Settings – see figure SAP – messaging: transfer settings.
-
Transfer Mapping – depending on the Type value selected in the Transfer Settings see figure:
-
Transfer Condition – see figure SAP – messaging: transfer condition.
See table SAP transfer settings for the full list of properties with explanations.
-
Click Save.
Transfer properties overview
|
Parameter |
Mandatory |
Description |
|---|---|---|
|
Enabled |
n/a |
Select or clear the check box to enable or disable the Barcode and Work Item configuration. By default the configuration is enabled. |
|
Transfer on Document Update |
n/a |
Select or clear the check box to enable or disable the transfer of ImageMaster document to SAP system when it is updated. |
|
Type |
Yes |
Choose between:
|
|
Content Repository |
Yes |
Select one of the registered content repositories, see chapter Content repositories configuration for details. |
|
Initial Transfer Status |
Yes |
This setting defines the status that is initially set for all sent items. A valid value can be selected from the predefined list:
|
|
SAP RFC Module |
Yes |
This setting defines different entry points into the SAP system. It will be set automatically after changing the type (see label “Type” in this table). Depending on the chosen type, one of the following default values is set:
In case of a generic transfer mapping, the name of an existing module must be entered in the transfer mapping. This determines about the fields that are shown and can be used to configure the mapping. |
|
Consistency Check |
Yes |
With this setting a MIME type check can be enabled. A document is not sent to SAP if the check fails. |
Transfer mapping for type “work item”
The section Transfer Mapping defines how data is mapped between ImageMaster and the SAP system. The panel layout depends on the selected transfer type regarding the field mapping. The displayed fields in this section depend on the type, selected in Transfer settings.
First select the Source Document Type. The list contains all available ImageMaster document types.
Via SAP Document Type specify the MIME type that is sent to SAP. The list contains all possible MIME types as defined in the Content Server configuration.
Via arObject specify values that trigger the SAP workflow.
Via Barcode specify the location where the barcode can be found.
For both “arObject” and “Barcode” input combinations are allowed as follows:
You can modify mappings:
-
Add an attribute via the plus sign
 (which shows a new input line).
 -
Delete an attribute via the minus sign
 .
.
The input area for ImageMaster allows combinations according to section Data location identifier.
Transfer mapping for type “barcode”
First select the Source Document Type: the list contains all available ImageMaster document types.
Specify the input for SAP Document Type. It defines the MIME type that is sent to SAP for the respective documents. The list contains all possible MIME types as defined in the Content Server configuration.
The Barcode entries define where the barcode can be found. The pair of drop-down lists allows combinations to be selected as described in table SAP transfer mapping – work item "arObject" / barcode above.
The Archive Date allows input combinations according to section Data location identifier.
Transfer mapping for type “generic”
With the option “generic”, that can be configured in the AdminClient, any RFC module on SAP side can be used to specify the transfer mapping, which is used to update values originating from SAP in ImageMaster. However, the update option can only be used with a valid license for ImageMaster MetadataSync for ERP.
-
First select the Source Document Type: the list contains all available ImageMaster document types.
-
Enter the name of the module in the field SAP RFC Module.
-
Click Load RFC Module.
The current mappings will be overridden by the mappings of the specified module. Depending on the customer-specific RFC module, subordinate tabs will appear where a transfer can be specified from the perspective of the SAP system:
-
Import (into SAP)
-
Export (from SAP)
-
Changing (a combination of import and export)
-
Tables (support for multiple rows in the context of multi-value attributes)
For a detailed description see the system manual section Generic transfer configurationin [SM ERP MSG].
The input area allows combinations according to section Data location identifier.
In the different transfers that can be configured, the same kind of data location identifier is supported, that consists of two input fields, which specify where exactly a value is extracted from:
|
Left value |
Description and characteristics of right input field |
|---|---|
|
fix |
Always use a constant value. If this option is selected, the right field is a simple text input. |
|
attribute |
Take the value from an existing document attribute. Select one of the attributes of the source document type. |
|
attribute_system |
Take the value from a document system attribute (like revisionId, documentId, creationTime, modificationTime). In contrast to normal attributes that are customized, system attributes with predefined names always exist. |
|
attribute_sap |
The SAP attribute defines the corresponding attribute name from the SAP system. SAP attributes always exist for any SAP document type in ImageMaster like: content repository, (SAP) document ID, logical system |
|
attribute_bin |
Take the value from a content property. If this option is selected, the right field is a simple text input. This option is only recommended for an experienced use since content properties are customer-specific, and therefore, no predefined list of values is provided. |
|
attribute_bin_system |
Take the value from the binary object properties. Select one of the existing properties. A binary object always exists if a file was successfully archived in ImageMaster, with properties like: fileSize, fileName, mimeType, hashDigest, hashAlgorithm, creationTime, modificationTime |
|
Table 46: SAP transfer mapping – data location identifier |
|
Transfer conditions
The Transfer Condition subtab defines conditions when a document is sent to the SAP system. A document will only be sent if the condition for the document evaluates to “true”. Otherwise the document is ignored.
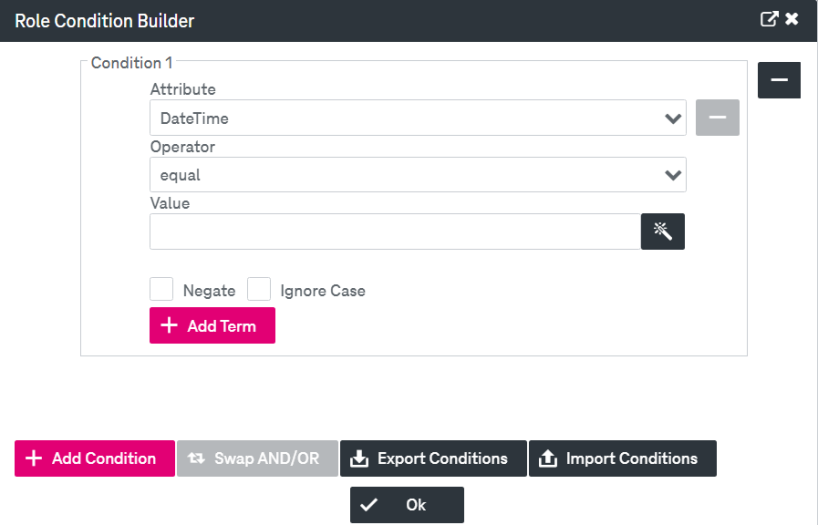
You have the possibility to create, edit, and remove conditions. The condition builder allows the visual definition of a workflow process for a document type based on certain attribute values.
To create a condition
-
Click Add Condition. The condition builder panel will be displayed:
-
Select an attribute of the specified document type from the list. Hidden attributes are not available.
-
Specify search criteria by choosing a comparison operator and setting your desired values.
The available comparison operators depend on the selected attribute type.
-
Optional:
-
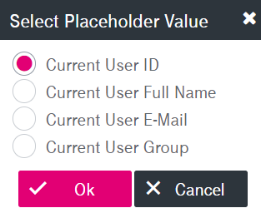
 Select Placeholder
Click the icon to specify the placeholder for the attributes. The option is supported for the attribute types "date/ dateTime" and "string". Select the available options in the appeared window and click OK:
-
Negate
Select the box to apply the logical operator "not" to the whole condition. The negated condition effects the opposite truth value.
-
Ignore Case
By default the search is case-sensitive. Select the box to deactivate case-sensitive search.
The specified value will be set as a placeholder for the corresponding attribute.
-
-
Optional: Add further search terms by clicking Add Term:
-
Terms can be connected by Boolean operators “and” (default) as well as “or”. By default, each term connected with “and” further reduces the result set. To change the connection, click Swap AND/OR.
-
Connection operators are evaluated in order of appearance.
-
-
To delete the term, click the minus icon nearby.
-
Optional: Click Add Condition to specify additional conditions.
Conditions can be connected by Boolean operators “or” (default) as well as “and”. By default, conditions connected by "or" retrieve results that match any condition. To change the connection, click Swap AND/OR.
-
Optional: Click Export Condition to obtain a pretty printed string. This string will be automatically copied to your clipboard.
-
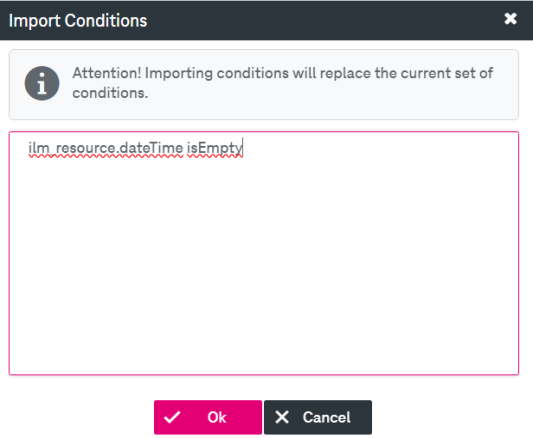
Optional: Click Import Condition to input predefined condition strings:
-
In the appeared window, paste the condition strings into the input area. Note that importing conditions will replace the current set of conditions.
-
To delete the condition, click the minus icon nearby.
If the selected document type contains no attributes, the condition can not be configured and the functionality is disabled.