Solr uses a feature called “core auto discovery” to find the cores to use. Solr scans the specified SOLR_HOME directory to find (sub-) directories containing a core.properties file. Solr will try to attach any core it finds in there. Each core represents an instance of a running Solr installation with its own directory structure and configuration files. A subdirectory within each core is used for storing the full-text index.
An ImageMaster Solr home ZIP archive is provided with ImageMaster for supported Solr versions (X.Y), like:
-
ima-solrX.Y-home-latest.zip
The ZIP archive contains a directory structure for one core. If you intend to use more than one core you have to duplicate (and rename) the included folder “solr.core” for each core. The included solrcore.property file must be configured separately depending on the architecture role of the core.
Make sure to use the correct ZIP archive with the intended Solr version, which is solr“8.11.4 or 9.x.y (x.y ≥ 0.0)” in this case, and do not confuse this with older ZIP archives that you may have received for previously supported Solr versions.
Follow these steps:
-
Extract the following subfolder (X is a placeholder for the matching release and version numbers)
ima-solrX-home-9.XX.X-X-config.zip\ima-solrX-home-9.XX.X-X\solr.core
to the Solr home path, which by default is:
[SOLR INSTALL DIR]/server/solr
-
Rename the above mentioned subfolder “solr.core” to “master”.
-
Open the folder “master” and create a subfolder “lib” and a subfolder “data”.
-
Copy the ImageMaster JAR file into the folder “lib”:
ima-solrX.Y-extract-latest.jar
The folder structure in the Solr home directory should look like this:
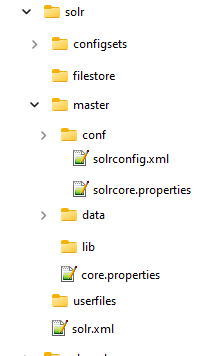
-
Under the folder “master”, open the file “solr.properties” and add the following lines:
dataDir=data
name=master
config=solrconfig.xml
-
Edit the solr.xml file:
-
Set “maxBooleanClauses” to 1048576:
<int name="maxBooleanClauses">${solr.max.booleanClauses:1048576}</int>
-
Solr version < 9.0:
Set the “shardsWhitelist” parameter. Assuming that Solr is running on port 8983, an entry like the following is needed:
<shardHandlerFactory name="shardHandlerFactory" ...
...
   <str name="shardsWhitelist">localhost:8983/solr</str>
...
</shardHandlerFactory>
Solr version ≥ 9.0:
For Solr version 9.0 and higher the defining allowed URLs for the shards parameter is not in the shardHandler configuration anymore. It is defined by the allowUrls top-level property of the solr.xml file:
Copy<?xml version="1.0" encoding="UTF-8" ?>
<!--
Licensed to the Apache Software Foundation (ASF) under one or more
contributor license agreements. See the NOTICE file distributed with
this work for additional information regarding copyright ownership.
The ASF licenses this file to You under the Apache License, Version 2.0
(the "License"); you may not use this file except in compliance with
the License. You may obtain a copy of the License at
http://www.apache.org/licenses/LICENSE-2.0
Unless required by applicable law or agreed to in writing, software
distributed under the License is distributed on an "AS IS" BASIS,
WITHOUT WARRANTIES OR CONDITIONS OF ANY KIND, either express or implied.
See the License for the specific language governing permissions and
limitations under the License.
-->
<!--
This is an example of a simple "solr.xml" file for configuring one or
more Solr Cores, as well as allowing Cores to be added, removed, and
reloaded via HTTP requests.
More information about options available in this configuration file,
and Solr Core administration can be found online:
http://wiki.apache.org/solr/CoreAdmin
-->
<solr>
<int name="maxBooleanClauses">${solr.max.booleanClauses:1048576}</int>
<str name="allowUrls">localhost:10080/solr,localhost:8983/solr,127.0.0.1:10080/solr</str>
<solrcloud>
<str name="host">${host:localhost}</str>
<int name="hostPort">${jetty.port:8983}</int>
<str name="hostContext">${hostContext:solr}</str>
<bool name="genericCoreNodeNames">${genericCoreNodeNames:true}</bool>
<int name="zkClientTimeout">${zkClientTimeout:30000}</int>
<int name="distribUpdateSoTimeout">${distribUpdateSoTimeout:600000}</int>
<int name="distribUpdateConnTimeout">${distribUpdateConnTimeout:60000}</int>
<str name="zkCredentialsProvider">${zkCredentialsProvider:org.apache.solr.common.cloud.DefaultZkCredentialsProvider}</str>
<str name="zkACLProvider">${zkACLProvider:org.apache.solr.common.cloud.DefaultZkACLProvider}</str>
</solrcloud>
<shardHandlerFactory name="shardHandlerFactory"
class="HttpShardHandlerFactory">
<!-- needs to be uncommented if using ssl -->
<!--<str name="urlScheme">https://</str>-->
<int name="socketTimeout">${socketTimeout:600000}</int>
<int name="connTimeout">${connTimeout:60000}</int>
</shardHandlerFactory>
</solr>
-
-
Restart Solr.
-
Go to the Solr administration user interface (e.g. http://{YOUR SERVER}.local:8983/solr/#/) and check that the “master” collection is showing under the “core selector” drop down menu.
Many further operations can be handled by the Solr administration user interface [Solr Admin UI].