Authentication settings allow you to define the following authentication options:
-
External Authentication: This involves a third-party authenticator that can be combined with a single sign-on mechanism.
-
Password Settings: This refers to your own authentication mechanism used in conjunction with a defined password policy.
(For single users further authentication settings can be configured according to section Authentication and certificates in Parameters of the users.)
Click the Operational Settings > Authentication tab to configure authentication settings.
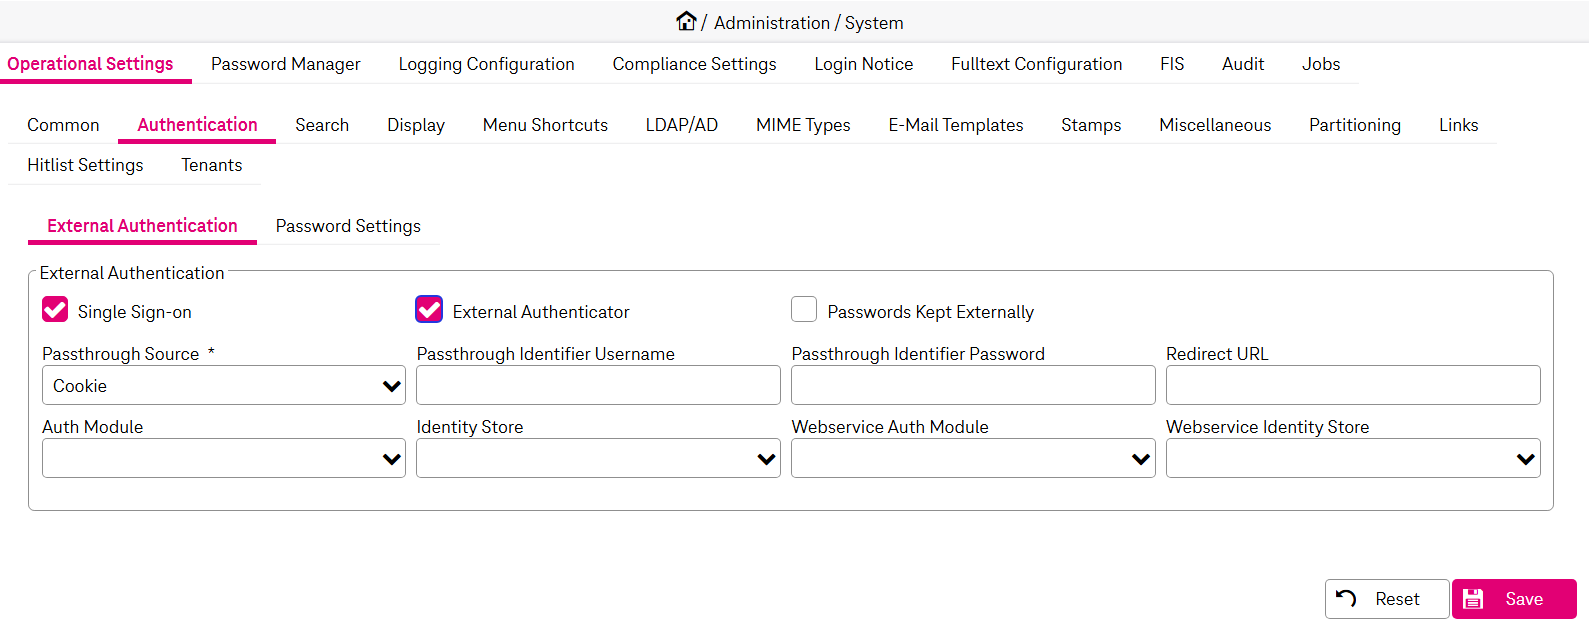
The following options are available:
-
to configure external authentication
-
to configure internal authentication and manage password policies
To configure external authentication
-
Go to the tab External Authentication.
-
Alternatively, select Single Sign-on (SSO) and define the name of the cookie that is used to pass the SSO data. See table Operational settings – authentication parameters for further descriptions. If you select any box on this panel to activate external authentication, all fields on the panels below will be disabled.
In case the SSO setting is enabled, it is possible to access the administration functionality by access to the special login page (login_as.jsf) even if the user is already logged in. Note that the currently running session can be broken in this case after confirmation.
-
ImageMaster offers a set of authentication and authorization methods. To configure the external authenticator, select External Authenticator.
ImageMaster supports JWT as an external authenticator. The JWT authenticator allows the handling of JWT tokens that are supplied to the ImageMaster by a leading system.In case this one is selected as Auth Module the following configuration panel is displayed:
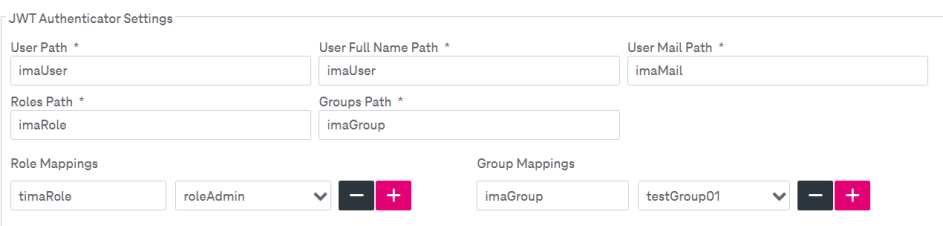
Figure 23: System – operational settings: JWT external authenticator
See table Operational settings – authentication parameters for more details on the parameters.
-
Select Passwords Kept Externally.
-
Click Save.
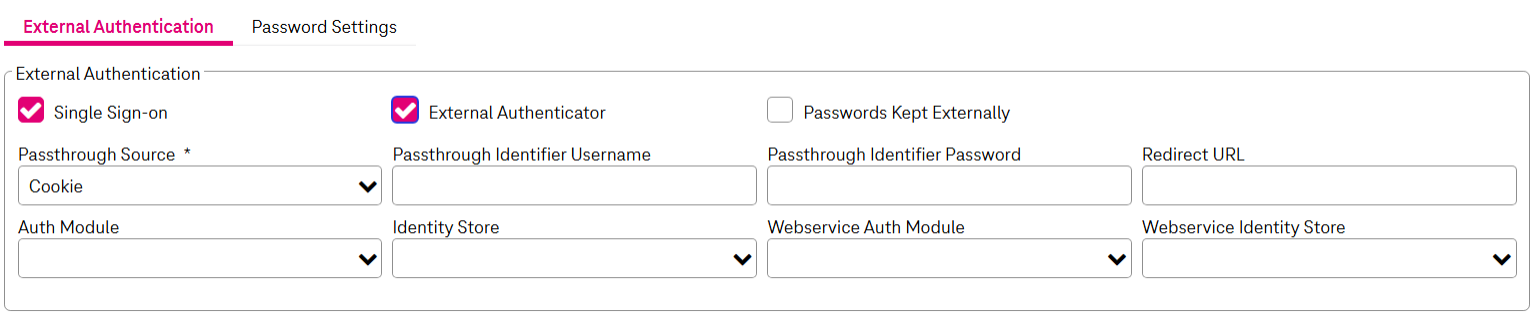
You may need to adjust the class name in case of an upgrade:
In practice, a case was observed with an upgrade from 9.7.2 to 9.8.1, where the class name of the external authenticator had to be adjusted:
-
from old: com.tsystems.ima.userlib.ldap.LdapAuthenticationFallback
-
to new: com.tsystems.ima.userlib.ldap.LdapGroupAuthentication
To configure internal authentication
-
Select an entry in Current Password Policy. With enough permissions you can also manage this list of password policies. See section To add a password policy below.
-
On the panels below specify the desired rules:
Mandatory fields are marked with an asterisk (*). See table Operational settings – authentication parameters for details.
Internal authentication fields are disabled if at least one box on the upper External Authentication panel is selected.
-
Click Save.
If you have enough permissions (General administration permissions > Configuration “System”), Add Password Policy and Delete Password Policy are visible to you (see next figure). You can define multiple password policies. One policy must always be designated as the default. Additional policies can be assigned to one or more roles.
-
Go to the tab Passwords Settings.
-
Click Add Password Policy.
-
Enter a unique name for the new policy and then click OK.
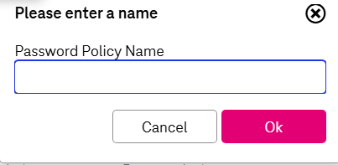
The new policy appears as selected in Select Password Policy.
-
To set the policy as the default, select the Default box. The default policy applies to users who are not covered by any role-specific policy. Role assignments are not available for the default policy.
-
To assign the policy to specific roles, make sure the Default box is cleared. The Role Assignments list is displayed. Select one or more roles to which this policy should apply. Currently assigned roles are shown in the dropdown.
During password checks and password creation, the system determines which policy applies to the user based on their role assignments. If a user has multiple roles with different policies assigned, the most restrictive policy takes precedence. The default policy is used for users whose roles have no specific policy assigned.
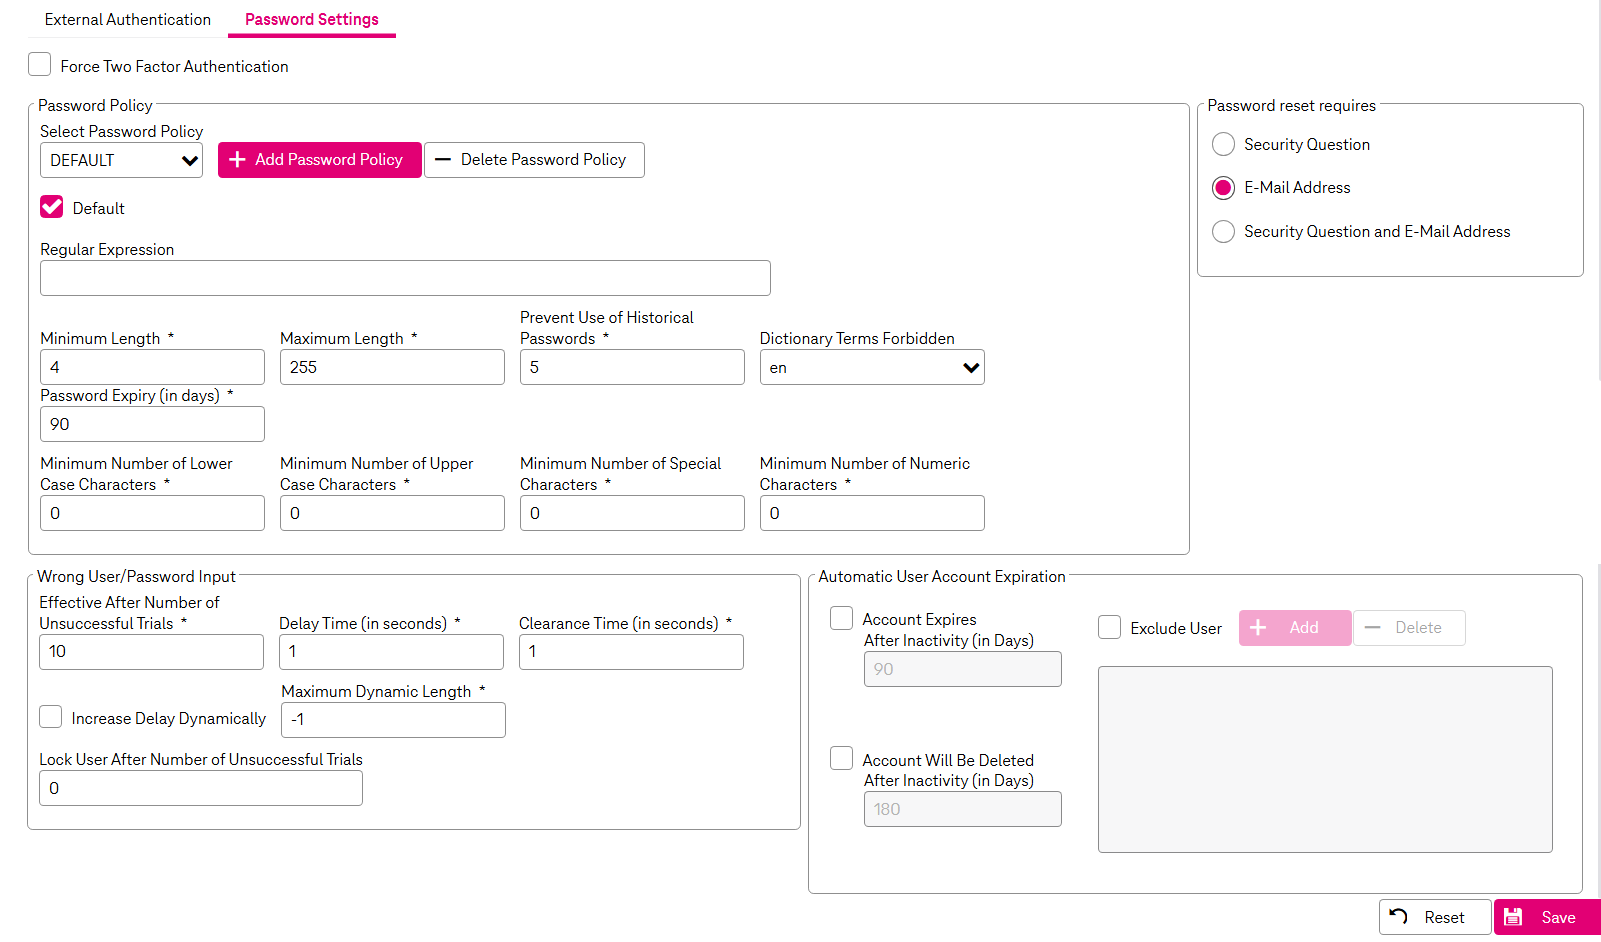
-
Make sure that the policy to be deleted is selected.
-
Click Delete Password Policy and confirm the deletion in the dialog.
-
Click Save.
At least one password policy must always be present. The last remaining policy cannot be deleted. To delete the current default policy, first designate another policy as the default.
Authentication configuration parameters
|
Parameter |
Description |
|---|---|
|
External Authentication tab |
|
|
Single Sign-on |
Select the box if the authentication should be done by a third party provider. The fields on the External Authentication panel become editable. |
|
External Authenticator |
Select the box to specify the external authenticator configuration. The following fields become enabled:
For related information see Authentication in [SM IS].
|
|
Passwords Kept Externally |
Select the box to manage passwords externally (password will not be stored within the system). If selected, the information available in the user’s Profile Settings is restricted to e-mail information, language, date, and decimal format settings. |
|
If the Single Sign-On box is selected: |
|
|
Passthrough Source |
Defines whether the information for credential pass-through is taken from the header directly or the header cookie. |
|
Passthrough Identifier Username / Password |
The name of the identifier that is used to read the username from a cookie or a header. |
|
Passthrough Identifier Password |
The password of the identifier that is used to read the username from a cookie or a header. |
|
Redirect URL |
The URL that the user will be redirected to when logging out. |
|
If the External Authenticator box is selected: |
|
|
Auth Module |
Select the class name of the authentication module. |
|
Identity Store |
Select the class name of the identity store. |
|
Webservice Auth Module |
Select the class name of the web service authentication module. |
|
Webservice Identity Store |
Select the class name of the web service identity store. |
|
JWT Authentication Settings Displayed if JWT Authenticator is selected as Auth Module: |
|
|
User Path |
The name of the path that is used to read the user identifier from the authenticator. |
|
User Full Name Path |
The name of the path that is used to read the username from the authenticator. |
|
User Mail Path |
The name of the path that is used to read the user mail address from the authenticator. |
|
Roles Path |
The name of the path that is used to read the role from the authenticator. |
|
Groups Path |
The name of the path that is used to read the group from the authenticator. |
|
Role Mappings |
Allows to map the role names of the leading system with the names of the ImageMaster roles. Mappings can be added |
|
Group Mappings |
Allows to map the group names of the leading system with the names of the ImageMaster groups. |
|
Password Settings tab To enable the fields below, clear Single Sign-on, External Authenticator and Password Kept Externally boxes. |
|
|
Force Two Factor Authentication |
When enabled, users are redirected directly to the Two Factor Authentication tab in their personal settings immediately after login, bypassing the standard password check. The setup must be completed before the client can be used. Navigating away from the tab is not possible until the configuration is finished. If Two Factor Authentication is not available, for example when SSO or an external authenticator is enabled, the setting is ignored and an error is logged. |
|
Select Password Policy |
There is always one default policy. If further policies have been set up, select an entry to switch to another policy and configure its settings. |
|
Add / Delete Password Policy |
Define a new policy or delete the selected one. See sections To add a password policy and To delete a password policy for details. |
|
Password Policies |
|
|
Default |
Select the checkbox to designate the currently selected policy as the default policy. The default policy applies to all users who are not covered by a role-specific policy. At least one policy must always be set as default. Default: false |
|
Role Assignments |
Assign one or more roles to the currently selected policy. This field is only displayed if the Default checkbox is cleared. Users with the assigned roles are subject to this policy during password checks and password creation. Currently assigned roles are listed in the dropdown.
Default: empty |
|
Password Check |
|
|
Regular Expression |
Enter a regular expression (see chapter Support of regular expressions) to be used as password check for the current policy. If a regular expression is defined, all other policy settings for the password check are ignored and disabled. |
|
Minimum Length |
Specify a minimum length of the password. Default: 4 |
|
Maximum Length |
Specify a maximum length of the password. A value of "0" means unlimited. Default: 255 |
|
Minimum Number of Upper Case Characters |
Specify the minimum number of uppercase alphabetic characters required. Default: 0 |
|
Minimum Number of Special Characters |
Specify the minimum number of special characters required. Default: 0 |
|
Minimum Number of Numeric Characters |
Specify the minimum number of numeric characters required. Default: 0 |
|
Dictionary Terms Forbidden |
Select one of the supported languages. The terms from this language dictionary will be forbidden inside passwords. Supported values: en, de, fr, es. Default: en |
|
Password Expiry (in days) |
Specify the time interval in days which determines the password expiry. The user must provide a new password in the login procedure if the old password has expired. Default: 90 |
|
Prevent Use of Historical Passwords |
This value indicates the number of passwords that were last used for at least 60 days which are forbidden. A value of 0 deactivates this check. Default: 1 |
|
Wrong User / Password Input |
|
|
Effective After Number of Unsuccessful Trials Default: 0 |
Enter the number of login failures (with a wrong password) after which a login delay becomes effective. When a delay is effective and a user tries to log in, an error message "Login Delayed" will be displayed. By default (with value 0) the delay mechanism is not active at all. The delay becomes ineffective again, when the time interval specified by “Clearance Time” has passed (see further below). |
|
Delay Time (in seconds) Default: 10 |
Enter the delay time in seconds, which becomes effective depending on the parameter “Effective After Number of Unsuccessful Trials”. If the delay mechanism is active, and a login failed for the first time, the user needs to wait 10 seconds (by default) until a login is possible again. If the option “Increase Delay Dynamically” is activated, which is true by default (see further below), the actual delay time is the value defined here multiplied by the number of unsuccessful trials. |
|
Clearance Time (in seconds) Default: 60 |
Enter the time interval calculated from the last unsuccessful trial after which the delay becomes ineffective again. A value of “0” means that no delay is ever effective because the delay becomes ineffective immediately. Assuming that a delay has become effective and the user waits for more than 60 seconds (in case of the default value) before trying to log in again, no delay is effective anymore. In the server-side configuration, the parameter “loginDelay.attemptTimeout” represents the same option as “Clearance Time” in the AdminClient. |
|
Increase Delay Dynamically Default: true |
Select the box to increase the time of delay after each unsuccessful attempt. If this option is activated, the actual delay time is the value defined by option “Delay Time” multiplied by the number of unsuccessful trials. In the default case this means: after the first login failure the delay is 10 seconds, after the second failure the delay is 20 seconds etc. |
|
Maximum Dynamic Length Default: -1 |
Maximum amount of seconds for which a login will be delayed when using the dynamic delay increase option. The default value is “-1”, which means that no upper limit is set. |
|
Lock User After Number of Unsuccessful Trials Default: 0 |
Enter the number of unsuccessful login attempts after which the user account is locked. If set to 0 (disabled), the user account will not be locked after repeated failed logins. |
|
Password reset requires |
|
|
Security Question |
Select this option to enable the security question reset mechanism. If a security question has been specified, an e-mail can be sent with a link that directs the user to the security question dialog to reset the password. If this option is selected the user will be asked to set a security question and password on the login. |
|
E-Mail Address |
Select this option to reset the forgotten password using the confirmation of the used e-mail address without answering the security question. |
|
Security Question and E-Mail Address |
Select this option to enable the security question reset mechanism with the confirmation of the used e-mail address. If a security question has been specified, user has to answer the security question and specify the e-mail address. |
|
Automatic User Account Expiration |
|
|
Account Expires |
A user account is disabled after inactivity (in days). Default: 90 |
|
Account Will Be Deleted |
A user account is deleted after inactivity (in days). Default: 180 |
|
Exclude User |
Users can be excluded from the automatic user account expiration settings. |