The Stamps configuration panel allows the definition of stamps that can be used as an overlay in PDF renditions. Here you define the layout, position and appearance of a stamp.
This must be done before you can assign a stamp to document types (according to section Stamping (for Stamping Service)) or to content repositories (according to section Content repositories configuration) later.

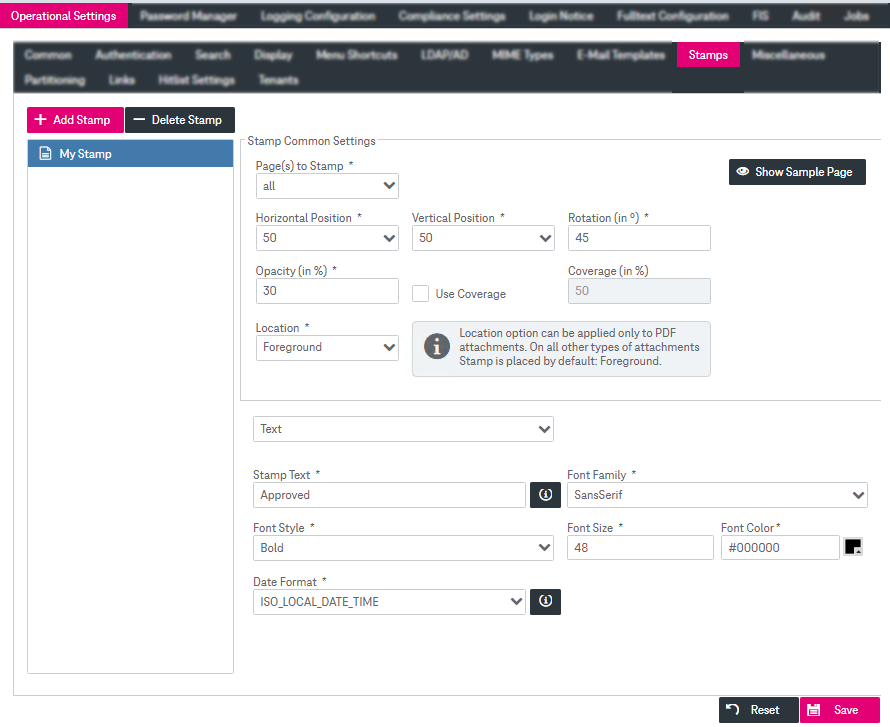
Figure 37: System – operational settings: stamps
The following functions are available:
-
adding and deleting stamps
-
changing an existing stamp
To add a new stamp
-
Click Add Stamp.
-
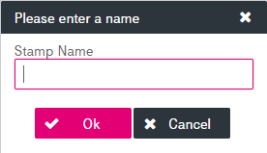
Enter the name of the new stamp and click OK:

-
The new stamp appears in the bottom of the list.
-
Modify stamp parameters (see below for more details).
-
Click Save.
To delete a stamp
-
Select a stamp to be deleted by clicking the corresponding stamp entry.
-
Click Delete stamp and confirm the dialog.
-
Click Save.
To change an existing stamp:
-
Select an existing stamp by clicking the corresponding entry.
-
Depending on the selected stamp type, complete the field values. Mandatory fields are marked by an asterisk (*). The stamp can be:
-
a plain text: custom text that can be configured
The input field supports the following placeholders:
-
$[username] : the ImageMaster user display name
-
$[userid]: the ImageMaster user identifier
-
$[serverTime]: the current date/time of the environment ImageMaster is running on
-
$[documentIdentifier]: the identifier of the document
-
#: adds a line break
-
-
an image: an image that can be uploaded from the local machine
The uploaded image must fit into a page as a stamp. In case it exceeds the defined size, an error message is displayed.
-
a print label: custom text that can be configured including setting a date in configurable format
The input field supports the following placeholders:
-
$[username] the ImageMaster user display name
-
$[userid] the ImageMaster user identifier
-
$[serverTime] the current date/time of the environment ImageMaster is running on
-
$[browserTime] the current date/time of the user's environment identified via browser
-
$[documentIdentifier] the identifier of the document
The print label is used as a footer or header only in printouts and appears outside of the actual document content area. The content of the label can be scaled down depending on the font size of the print label text. Only one line of text will appear, so the print label text will be compressed to fit. -
See the table below for detailed field descriptions.
-
-
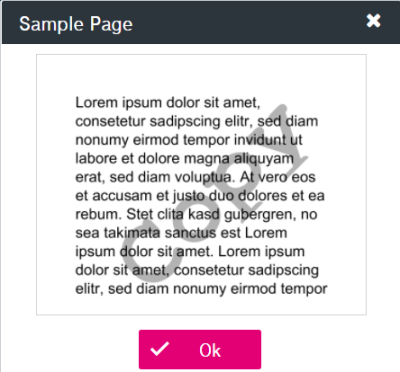
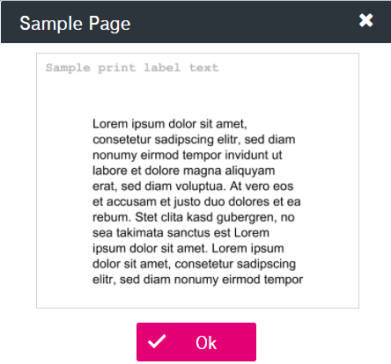
You can preview the document with the configured stamp by clicking Show Sample Page. A test PDF document with the configured stamp will be displayed. To close the window, click Ok.


Figure 38: System – operational settings: stamp preview (text stamp / print label)
When the configuration settings have been completed, click Save.
The stamp settings are listed in the table below:
|
Parameter |
Description |
|
|---|---|---|
|
Stamp Common Settings |
||
|
Page(s) to Stamp |
The pages of a PDF document that are stamped The following options are available:
|
|
|
Horizontal Position |
The horizontal position of the text stamp on the page (left, center, right or a value in %) |
|
|
Vertical Position |
The vertical position of the text stamp on the page (top, center, bottom or a value in %) |
|
|
Rotation (in °) |
The clockwise rotation of the text stamp defined in degrees |
|
|
Opacity (in %) |
The opacity level of the text stamp |
|
|
Use Coverage |
Activates the coverage mechanism which uses a percentage size for the text stamp instead of an absolute image width and height Available only for text and image stamps |
|
|
Coverage (in %) |
Size-related coverage of the document by the text stamp (enabled if the coverage usage is active) Available only for text and image stamps |
|
|
Location |
The location of the stamp content in relation to the document content (PDF format only) The following options are available:
Available only for text and image stamps |
|
|
Print label specific settings |
||
|
Horizontal Margin |
Value in pixels used to define right and left margin Default value is 10. |
|
|
Vertical Margin |
Value in pixels used to define top and bottom margin Default value is 15. |
|
|
Label to Content Margin |
Value in pixels used to define the spacing between print label and content space Default value is 10. |
|
|
Text |
||
|
Stamp Text |
The text that is displayed as an overlay To display available placeholders, click icon |
|
|
Font Family |
Font family of the print label Select one of the available fonts. The list of fonts is system specific. The common ImageMaster filter functionality is available to search over the list of provided fonts. |
|
|
Font Style |
Font style of the stamp text: Regular, Bold, Italic |
|
|
Font Size |
Font size of the stamp text in pixel The size cannot be set if the coverage option is used. |
|
|
Font Color |
Font color of the stamp text, which must be given in HTML notification |
|
|
Date Format |
ISO date format to be used in print label To display supported formats, click icon |
|
|
Image |
||
|
Width (in px) |
Image width in pixels (cannot be set with coverage option) |
|
|
Height (in px) |
Image height in pixels (cannot be set with coverage option) |
|
|
Upload Stamp |
Uploading an image from the local machine If the upload succeeds, a corresponding message will be displayed near the upload button. |
|
|
Print Label |
||
|
Stamp Text |
The text that is displayed as a header or footer To display available placeholders, click icon |
|
|
Font Family |
Font family of the print label Select one of the available fonts. The list of fonts is system specific. The common ImageMaster filter functionality is available to search over the list of provided fonts. |
|
|
Font Style |
Font style of the print label: Regular, Bold, Italic |
|
|
Font Size |
Font size of the print label in pixels If the horizontal margin is configured via system property and the print label does not fit the page, the font size of the print label will be reduced to fit. For more details on the available system properties for print labels see |
|
|
Font Color |
Font color of the print label, which must be given in HTML notation |
|
|
Date Format |
ISO date format to be used in the print label To display supported formats, click the icon |
|
|
MIME types |
Restrict stamping to selected MIME types If you select entries here, stamps will only be applied to the specified MIME types. The following MIME types and their variations are supported: PDF, TIFF, JPEG, and TXT. |
|
|
Table 8: Operational settings – stamps parameters |
||
 next to the