Within user management configuration room, you can perform the following actions:
-
add users to the system or delete users from the system
-
change the user’s properties
Changing the Password Expiry property and assigning roles can be done concurrently for multiple users while other properties are changed for only a single user.
-
assign roles to users
-
assign groups to users
-
create a document type access report indicating access matrix for each user
-
create a report on the effective permissions of each user
-
generate passwords for multiple users
-
import users from a predefined Excel file
This action is useful for importing multiple new users or updating multiple existing users.
-
export users credentials
-
displaying seat details for a user (available only in case of seats license)
-
try out user permissions
This may be needed, for example, when setting a productive system or changing the password policy in a way that requires generating new passwords for users. The action creates new passwords and generates an Excel list with new user passwords and e-mails, so the administrator can send a notification to all users handing over the new passwords.
Note that all the above-listed actions can be done by the user that has the appropriate permissions. At the beginning, the system contains a predefined user that has permissions for all actions.
To add or delete users
-
Click Add User to specify a new user. A creation dialog is displayed. Enter the name of the new user and click OK:
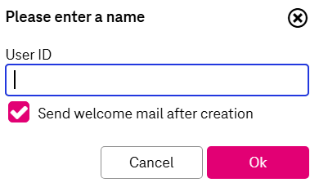
Username may contain special characters as “@” and “\”.
-
Optionally select the box to send welcome mail after user creation.
The content of the welcome mail can be configured by the administrator, see E-mail templates configuration for more information.
If selected the password for a newly created user will be sent in the mail via a link. Therefore it is impossible to specify the password in the user settings.
The welcome mail can be resent later if the link becomes invalid or the user misses the mail. Expand menu More in the upper functional panel and select Resend Welcome Mail . The preconfigured welcome mail will be resent to the selected users after the confirmation.
-
The new user appears at the top of the list.
User names are stored and displayed in the originally configured case, but the username check on the client login is case-insensitive.
-
Click Delete User to remove the selected users from the list. For multiple selection select the corresponding check boxes. Confirm the action in the dialog.
Note that user will be permanently deleted from the system after the confirmation.
-
Click Save.
On success the corresponding message appears with a button Show User to display the newly created user in the hit list with automatically applied filter with the corresponding user name.
To change user properties
-
Select the required user from the list: the user’s properties are displayed on the User Details panel.
-
Alternatively, to change an expiry date for multiple users, select the corresponding check boxes. The User Details panel is empty.
-
Adjust the properties as desired (see table Users, roles, groups – users: properties description).
Mandatory fields are marked with an asterisk (*). The Password Expiry field can be changed for multiple users at once. To do so, select the corresponding check boxes and enter a common expiry date value.
-
Administrator can reset the password and notify an user via the mail. Expand menu More in the upper functional panel and select Send Password Reset Mail . The preconfigured password reset mail will be resent to the selected users after the confirmation.
-
Select the language from the drop-down field for the user. The language setting overrides the selected language during login. An info notification will be displayed when you log in. In this case the language will be switched to the predefined language of the user.
-
The Two-Factor Authentication state shows if the two-factor verification is enabled or disabled for the user. If it is enabled, the state Enabled is displayed and the button Disable is available. To temporary disable two-factor verification, click Disable and confirm your action. For more information on how to enable two-factor authentication and how to use it, see chapter Editing user information in [UM WorkplaceClient].
-
Click Save.
-
Select the required user from the list. The user’s properties are displayed on the User Details panel.
-
Alternatively, to assign roles to multiple users, select the corresponding check boxes. The User Details panel is empty.
-
Click Assign Roles in the upper functional panel. The Available Roles dialog is displayed.
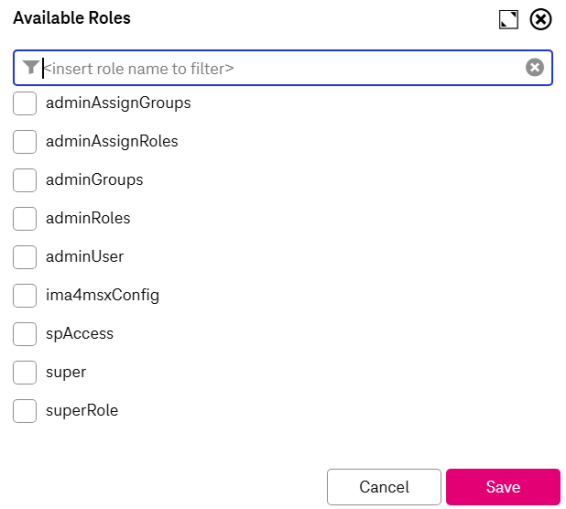
The dialog contains a list of all custom roles created by the Administrator. The list is limited to display only 100 items. To retrieve other items (if applies), use general ImageMaster filtering functionality in the upper area of the window.
The list of available roles does not include system roles. To assign a system role to the user, go to the roles section, create a new role and include the desired system role.
Also see chapter Role usage (combining roles) for details.
In case multiple users are selected, you can assign new roles to the selected set of users retaining individually assigned roles. The selected boxes in this case indicate roles that are assigned to all currently selected users.
-
Activate or deactivate the roles to compose the list of roles assigned to the user (or set of users) and click OK to close the dialog.
-
Click Save to complete your changes.
-
Select the required user from the list. The user’s properties are displayed on the User Details panel.
-
Alternatively, to assign roles to multiple users, select the corresponding check boxes. The User properties panel is empty.
-
Click Assign Groups in the upper functional panel. The Available Groups dialog is displayed.
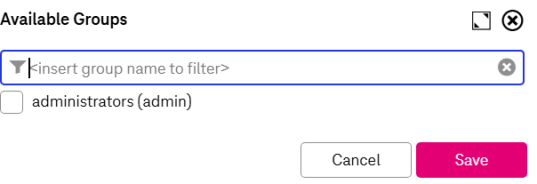
The dialog contains a list of all custom groups created by the Administrator. The list is limited to display only 100 items. To retrieve other items (if applies), use general ImageMaster filtering functionality in the upper area of the window.
In case multiple users are selected, you can assign new groups to the selected set of users retaining individually assigned roles. The selected boxes in this case indicate groups that are assigned to all currently selected users.
-
Activate or deactivate the groups to compose the list of groups assigned to the user (or set of users) and click OK to close the dialog.
If the user is assigned to several groups, the group can be changed from the main navigation menu for the current session.
-
Click Save to complete your changes.
To create an access matrix
-
Select the user in the list for which you want to create an access matrix. If no user is selected, the matrix will be created for all users to which the currently logged-in user has access. Expand the menu More in the upper functional panel and select Create Access Matrix. The dialog with the access matrix options opens:
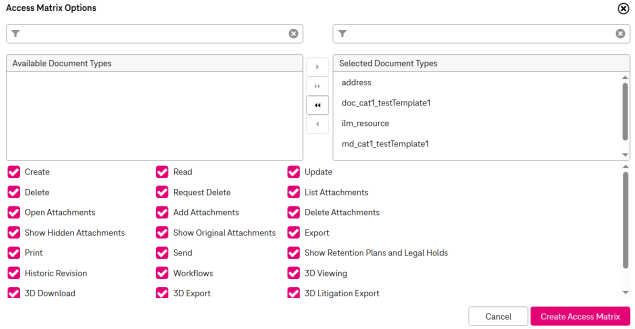
Figure 134: Users, roles, groups – users: access matrix
-
Select document types for which you want to create a report. Adding and deleting document types from the selected items list is similar to creating a user report (see section above).
-
Select the check boxes with access permissions that you want to display in the report. By default all permissions are preselected.
-
Click Create Access Matrix. The matrix will be created in Excel format and a save dialog appears. Reports are prepared asynchronously in the background. You can switch to another view while the process runs. Once completed, a notification with a link to download the files will appear in the upper panel. If you end your session before the process completes, a notification with a link will be displayed upon your next login, allowing you to download the report.
-
Select the directory and click Save.
To create a user report
-
Expand menu More in the upper functional panel and select Create User Report. The report will be created in PDF format and opened in a new browser tab.
-
Information on currently selected users will be included in the report.
To generate a security report
-
Expand menu More in the upper functional panel and select Create Security Report.
-
The report will be created in Excel format and offered for download. Reports are prepared asynchronously in the background. You can switch to another view while the process runs. Once completed, a notification with a link to download the files will appear in the upper panel. If you end your session before the process completes, a notification with a link will be displayed upon your next login, allowing you to download the report.
-
Information on general user authentication for all available in the system users will be included in the report with the following parameters:
-
Security question set
-
Password expired
-
Two factor authentication enabled
-
Locked status of a user
-
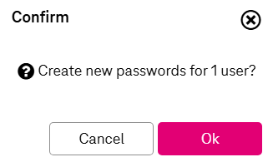
To generate passwords for multiple users
-
Select one or several users whose passwords should be changed.
-
Click Create Passwords. The Message dialog opens:
-
Click OK to start creating passwords. A dialog opens suggesting you to save an Excel file with the generated passwords. Choose the desired directory and optionally change the name of the file. The default name is “passwords-<date>-<time>”.
-
Upon completion, the following actions are performed:
-
New passwords are generated.
-
The passwords are changed to the generated values.
-
The expiry date is reset to the current date.
An Excel sheet contains the following fields for each user:
-
A – User ID
-
B – Username
-
С – E-Mail
-
D – New password
It is strongly recommended that the administrator sends a notification to all users informing them about the password change and hands over the new passwords in an appropriate manner. The users should be prompted to change their passwords in their User Profile dialog (see [UM WorkplaceClient] for details on this dialog).
-
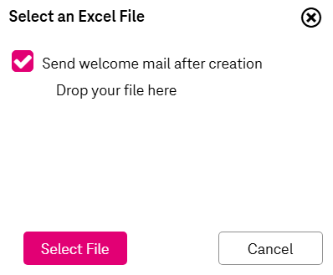
To import users from an Excel file
-
Expand menu More in the upper functional panel and select Import Users. The select file dialog opens:
-
Click Select File to import user information from an Excel file or add such a file using drag and drop and click Import.
The format of the Excel sheet is fixed with the following columns:
-
A – User ID (mandatory)
-
B – Display Name (mandatory)
-
C – Department
-
D – E-Mail
-
E – Expiration Date
-
F – Password (mandatory)
-
G – Password Expiry
-
H – Roles (separated by semicolon)
-
I – Groups (separated by semicolon)
-
J – Language in ISO 639-1 code, e.g. “de”, “en”, “fr”, or “es” (mandatory)
Only properties with a defined value will be updated. If no value is given in the Excel table, the respective user property remains as is when updating.
If a user with a given ID already exists, this user will be updated with the data provided in the Excel sheet.
If the Password Kept Externally option is enabled (see Authentication settings for more details), the “Password” column becomes optional.
-
-
Optionally select the box to send welcome mail after user creation.
The content of the welcome mail can be configured by the administrator, see E-mail templates configuration for more information.
If selected, the password for a newly created user will be sent in the mail via a link. Therefore it is impossible to specify the password in the user settings.
The welcome mail can be resent later if the link becomes invalid or the user misses the mail. Expand menu More in the upper functional panel and select Resend Welcome Mail. The preconfigured welcome mail will be resent to the selected users after the confirmation.
-
Click Save to trigger the import.
-
The user import will be started asynchronously. The import status and progress will be displayed in the Activities room. When the import is triggered the corresponding notification message is displayed with the action to switch to the activities tab.
-
Note that it is impossible to run multiple user imports. Go to the Activities room to check the progress of the current user import.
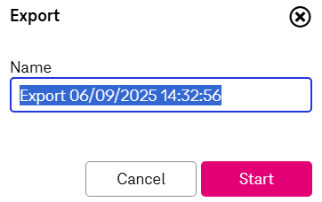
To export user credentials
-
Expand menu More in the upper functional panel and select Export Users. The export dialog opens:
-
Optionally change the default name of the export file.
-
Click Start. Reports are prepared asynchronously in the background. You can switch to another view while the process runs. Once completed, a notification with a link to download the files will appear in the upper panel. If you end your session before the process completes, a notification with a link will be displayed upon your next login, allowing you to download the report.For more details on export functionality see chapter Export functionality.
-
The entry on the user export is stored in Activities room under Administration Activities tab.
To display seats
The functionality is only available if the seat license is used.
-
Expand menu More in the upper functional panel and select Show Seats. The dialog User Seats with user seat options opens:

-
The list displays all users available in the system, information on the provided licenses and the date of the last login.
-
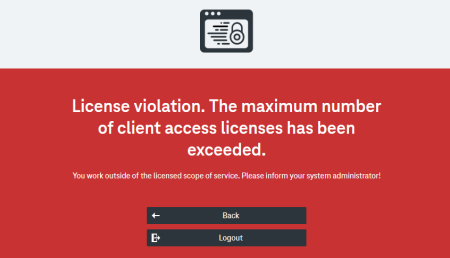
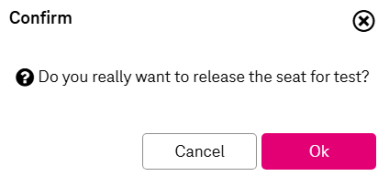
To release a seat, select a user and click Release Seat. Confirm your actions in the dialog by clicking OK:
-
The user is not removed from the system but may receive an error message as illustrated below.
-
The login is denied:
-
A specific action within the WorkplaceClient is denied:

-
The license seat will be released for the selected user.
To simulate another user (try out user)
-
Select a user whose permissions you want to test.
The administrator permissions themselves must contain the permissions of the user being tested. You are unable to simulate a more powerful user than the one currently logged in. -
Expand the menu labeled More in the upper functional panel. From the expanded menu, select Try Out User.
-
After selecting Try Out User, the view will switch to the homepage.
-
The view will display the client assuming that you have the permissions of the selected user.
-
Your actual permissions will be reduced to reflect the ones of the simulated user.
-
You will not get any more permissions than you actually have.
-
-
You can interact with the application as if you were the selected user to test their permissions. If needed, you can adjust the permissions of the selected user based on your testing.
-
In the upper panel, a notification message will be displayed. This message informs you that you are trying out another user:

-
To return to the user administration panel with all your normal permissions, you can click the link provided in the notification panel.