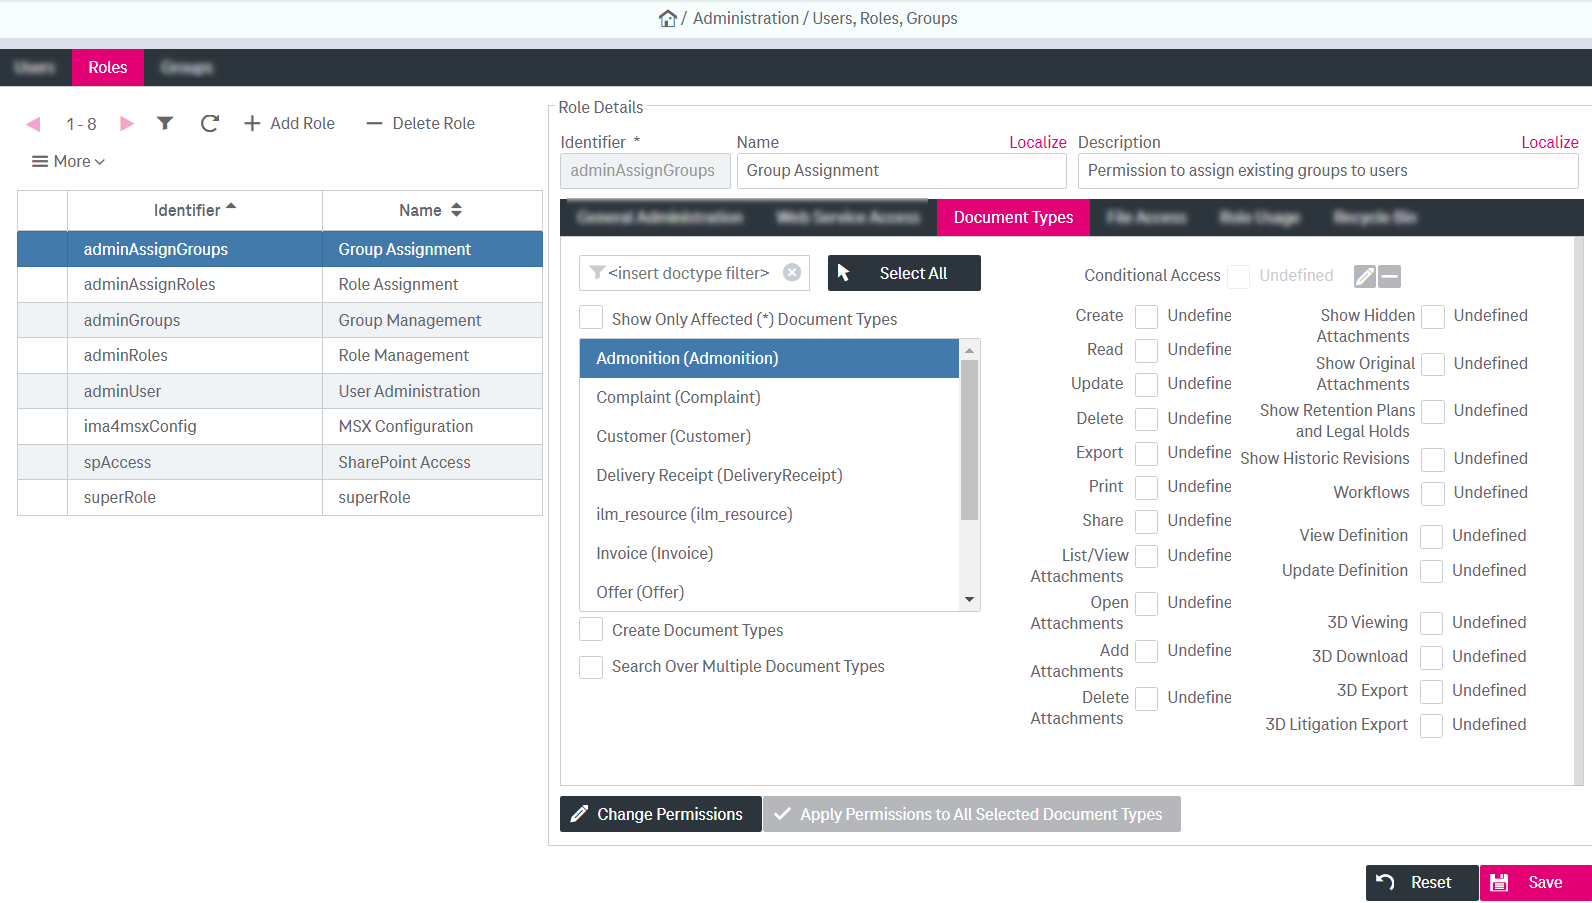
The panel Document Types deals with permissions that can be set for a role on specific ImageMaster document types.
Depending on these permissions, a document type is also listed in the document types room, where further settings are available according to the previous chapter Document types (handling the document structure).
Available document types are shown in a list. Document types used by the selected role are indicated with an asterisk (*). After selecting one or multiple document types in the list, it is possible to set the permissions for the selected role.

Figure 131: Users, roles, groups – roles: document type administration permissions
To configure permissions for specific document types
Every configuration made here always refers to exactly one role that is selected in the role list. In addition, it refers to at least one document type, but can also affect multiple selected document types.
-
Select a document type, then select the desired check boxes, and finally confirm with Save.
You can filter the list to only show document types used by the selected role withShow Only Affected (*) Document Types. Also see Setting permissions for a role.
If no read permission for any document type is set to “Enabled” for a role, none of the configuration rooms will be available to the role and therefore the administration view will be unavailable.
If a read permission is set to “Disabled”, the corresponding document type will also be unavailable in user views. It is not recommended disabling any permissions unless this is explicitly required by your permission model! Often a “disabled” permission is too restrictive when you combine roles, and “undefined” is enough to deny the permission. Also see Role usage (combining roles).
-
To change the permissions for multiple selected document types at once, first select several document types. Edit the permissions, then click Apply Permissions to All Selected Document Types, and finally confirm with Save.
Avoid changing the multi-selection in the document type list while you are still editing the permissions. Currently ongoing changes will be undone if they have not been confirmed with Save.
The table below explains the meanings of the operations for which you can edit the permissions. If the permission for an operation within a document type is set to “Enabled”, a user with the assigned role can perform the action with all documents of the corresponding document type.
|
Operation |
Description |
|---|---|
|
Create |
The user is allowed to create new ImageMaster documents of this type. |
|
Read |
The user is allowed to view the documents’ metadata, i.e. the user can find documents of this type by a search and they are displayed in the hit list. |
|
Update |
The user is allowed to change ImageMaster documents, i.e. to update metadata and to add or remove attached files. |
|
Delete |
The user is allowed to delete all underlying revisions of the document. After deletion the document may physically remain in the archive, yet it will not be accessible by the user via the Web client. |
|
Export |
The user is allowed to export documents. |
|
|
The user is allowed to print documents. |
|
Send |
The user is allowed to send document links per e-mail. |
|
List / View Attachments |
The user will see the list of the files attached to the document. Moreover, this allows opening the preview of the attachments. |
|
Open Attachments |
The user is allowed to open each of the files attached to the document. This operation covers opening the attachment externally as well, similar to a download. When this permission is enabled, the “List/View Attachments” permission with an “Undefined” value will be enabled. |
|
Add / Delete Attachments |
The user is allowed to add a file attachment to a document and to remove it. When this permission is enabled, the “List/View Attachments” and “Open Attachments” permissions with “Undefined” values will be enabled. |
|
Show Hidden Attachments |
The user will see hidden document attachments. |
|
Show Original Attachments |
The user will see original document attachments. |
|
Show Retention Plans and Legal Holds |
The user is allowed to view Retention Plans and Legal Holds for documents, i.e. the corresponding context menus will be available in the hit list. See chapters Access to retention management and Access to legal holds for scenarios of Retention Plans and Legal Holds configuration and chapter Publications for further related details. |
|
View Definition |
The user is allowed to view definitions. |
|
Update Definition |
The user is allowed to change definitions. |
|
For the 3D options below also see 3D Structures |
|
|
3D Viewing |
The user is allowed to view 3D documents. |
|
3D Download |
The user is allowed to download 3D documents. |
|
3D Export |
The user is allowed to access 3D exports. |
|
3D Litigation Export |
The user is allowed to access 3D litigation exports. |
|
Table 39: Roles management – document access permissions: operations |
|
To configure general permissions of document type handling
These permissions are not focused on a specific document type but rather refer to the creation of document types and searching document types.
-
To enable the creation of document types for a role, select Create Document Types.
If this permission is enabled, read access to the full list of document types becomes enabled, even if their read permissions are set to “Undefined”.
To explicitly exclude a document type from the list of the document types accessible by the role, set the read permission for this document type to “Disabled”. Otherwise note: It is not recommended disabling any permissions unless this is explicitly required by your permission model! Often a “disabled” permission is too restrictive when you combine roles, and “undefined” is enough to deny the permission. Also see Role usage (combining roles).
-
You can enable Search Over Multiple Document Types for a role.
This allows the selection of multiple document types in the search form of the WorkplaceClient.
To add and edit conditions
You can specify conditions on a document type. A condition can limit the access to specific documents of a document type based on the attribute values of a document.
-
Before you can continue, at least one permission must be enabled. Only then will the condition symbol become active.
-
When you later confirm the condition with OK, and return from the condition builder dialog, do not forget to also click Save in the Document Types tab!
Follow these steps:
-
Click the edit condition icon:

The condition builder dialog will be displayed.
-
Click Add Condition. The condition builder panel will be displayed:
-
Select an attribute of the specified document type from the list. Hidden attributes are not available.
-
Specify search criteria by choosing a comparison operator and setting your desired values.
The available comparison operators depend on the selected attribute type.
-
Optional:
-
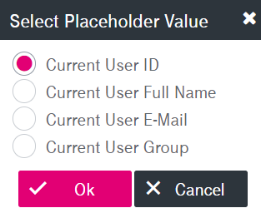
 Select Placeholder
Click the icon to specify the placeholder for the attributes. The option is supported for the attribute types "date/ dateTime" and "string". Select the available options in the appeared window and click OK:
-
Negate
Select the box to apply the logical operator "not" to the whole condition. The negated condition effects the opposite truth value.
-
Ignore Case
By default the search is case-sensitive. Select the box to deactivate case-sensitive search.

The specified value will be set as a placeholder for the corresponding attribute.
-
-
Optional: Add further search terms by clicking Add Term:
-
Terms can be connected by Boolean operators “and” (default) as well as “or”. By default, each term connected with “and” further reduces the result set. To change the connection, click Swap AND/OR.
-
Connection operators are evaluated in order of appearance.
-
-
To delete the term, click the minus icon nearby.
-
Optional: Click Add Condition to specify additional conditions.
Conditions can be connected by Boolean operators “or” (default) as well as “and”. By default, conditions connected by "or" retrieve results that match any condition. To change the connection, click Swap AND/OR.
-
To delete the condition, click the minus icon nearby.

If the selected document type contains no attributes, the condition can not be configured and the functionality is disabled.
-
Click Ok to create the condition.
You will now return to the Document Types tab.
-
Click Save!
Only a final “Save” stores the role permissions, which contain the conditions for the document type!